The need for a trailer for a walk-behind tractor in a homestead is difficult to overestimate. It can be useful for many things: transportation of seedlings and harvested crops, as well as necessary tools and even garbage. Having spent just a few days to make a trailer for a walk-behind tractor with your own hands, you can greatly facilitate your future work.
The simplest trailer model
For the construction of the construction necessary for the farm, it is necessary to prepare:
- Steel pipes 60x30 mm and 25x25 mm;
- Springs and wheels (it is possible from the Moskvich car);
- Duralumin sheet 2 mm thick;
- A section of sheet steel with a thickness of 0.8 mm;
- Channel number 5;
- Fasteners;
- Tools (jigsaw, grinder, welding machine and screwdriver).
The trailer frame is a one-piece structure placed on the frame grid. For its arrangement, it is necessary to make two traverses from a corner of 25x25 mm, which will act as front and rear crossbars, and spars from a pipe of 60x30 mm. All elements are connected using five crossbars so that a lattice is formed as a result.

A simple trailer model with folding sides is a very necessary thing in the household. With it, you can not only transport boxes and bags with harvested crops, but any long loads
When arranging the platform of the lattice, it is necessary to place the cross members and the cross beam relative to the side members so that small outlets remain. Subsequently, longitudinal pipes will be welded to them.
Four racks are attached to the longitudinal pipes by welding, to the upper part of which bracing is welded from a corner of 25x25 mm. To equip the trailer with hinged sides, the frames of the structure are made separately from the frame. The platform grate is covered with duralumin sheet, fixing it with bolts. For sewing on boards, thinner metal sheets can be used, fixing them to strapping and racks by welding.
To make a beam, two channels of the same length are inserted into each other, equipping one of the ends of the structure with wheel axles. The finished beam using springs is connected to the side members. To do this, the ends of the springs are put on the axis of the bracket and the axis of the earring, and the central part is welded with ladders to the beam.
The drawbar is made of rectangular pipes 60x30 mm. For the manufacture of a two-beam design, the front ends of the pipes are joined and welded to the body of the towing device of the unit, and the rear ends with an overlap of 200 mm are welded to the front ends of the side members.
The trailer is ready. If desired, it can be equipped with brake lights, turn signals and parking lights.
How to choose a walk-behind tractor for a garden read here: //diz-cafe.com/tech/kak-vybrat-motoblok.html
Production of a multifunctional trailer
Stage # 1 - preparation of materials for construction
When planning to make a trailer on your own, you must first develop a drawing in which to calculate the dimensions of the structure and present its future appearance.

Thinking over the dimensions and carrying capacity of the structure, it should be calculated that, with the help of the trailer, it is possible to transport an average of 6-7 bags of vegetables with one trailer, the total weight of which is about 400-450 kg
Having decided on the dimensions of the trailer, you need to calculate the required number of meters of metal. You also need to calculate the number of channels that will act as a frame for the hitch. Having paid enough attention to this stage, you can not only save costs by protecting yourself from the possible costs of acquiring extra screws and corners, but also make sure your actions are correct.
In the manufacture of a home-made trailer, you can not do without a welding machine, since on a self-tapping screw the functional design will not last long.
Also, material on the proper storage of power tools will be useful: //diz-cafe.com/tech/kak-xranit-instrumenty.html
To equip a strong trailer frame, steel corners with a cross section of 50x25 mm and 40x40 mm, as well as trimming pipes of rectangular and round section, are suitable. For the manufacture of the trailer body, boards 20 mm thick and a beam 50x50 mm in size for the support beams will be required.
Stage # 2 - production of basic elements
As a basis in the manufacture, you can take the finished development of the structural part.

The trailer has an increased margin of safety, which allows it to be used on complex relief surfaces
The design has four main components: body, carrier, frame and wheels. All of them are connected by welding.

To increase the structural strength at the junction of the drawbar with the body of the rotary assembly, four stiffeners are provided
The body is a wooden structure assembled from 20 mm boards, the corners of which are equipped with steel corners. The body is attached to the frame of the trailer with the help of three wooden bars - supporting beams.

The trailer frame is made from a set of steel elements: pipes, corners and a bar
Since such a trailer is a single-axle design, the load distribution should be such that the center of gravity is shifted to the front, without leaving the axle of the wheels. The only drawback of such a body is that there are no folding sides. If desired, the design can be slightly improved by arranging the folding walls. It is also advisable to make side loops with straps on the body, which will be necessary to fix the cargo during transportation.
Stage # 3 - arrangement of the chassis
The chassis of the structure is one of the key in the manufacture of a makeshift trailer for walk-behind tractor.

Wheels and springs can be purchased new, but it’s much easier to use outdated parts of a domestic car, for example, from Moskvich or Zhiguli
In our case, wheels are mounted on the trailer, which were removed from the CPD motorized carriage and used in assembly with the hub. To match the axial rod with the diameter of the bearings of the hub, it is necessary to sharpen its ends.
When arranging the wheel axle, it is sufficient to use a steel rod with a diameter of 30 mm. The length of the shaft should be such that the assembled wheel structure does not protrude beyond the body rims. The rod by welding is attached through scarves and corner supports to the side members and the body of the longitudinal joint.
To connect the trailer to the walk-behind tractor you need to make a console. It will be attached to the attachment bracket, so its upper part should repeat the contours of the hiller holder. The lower part of the console is an axis around which the rotary assembly of the carrier freely rotates with the help of angular contact bearings in a fixed position.
How to make an adapter for a walk-behind tractor yourself: //diz-cafe.com/tech/adapter-dlya-motobloka-svoimi-rukami.html

The original version proposed by the author provides for the articulation of the carrier with the trailer
The drawbar is inserted into the tubular body of the longitudinal joint and secured with a thrust ring. This design solution facilitates the control of the unit on uneven surfaces, since the trailer wheels will work independently of the wheels of the walk-behind tractor.
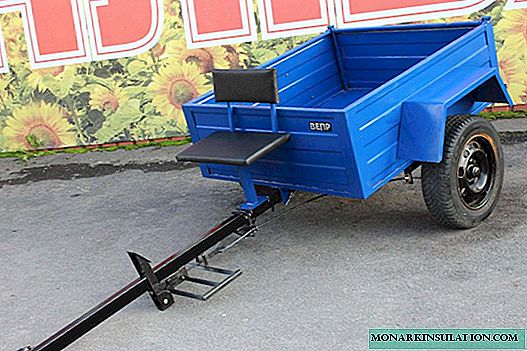
The trailer is almost ready for use. It remains only to place a driver’s seat in front of the body and attach a footboard, which can be supported during driving, in a special frame on the drawbar.
Other trailer manufacturing options: video examples
The driver will control the unit from the seat, holding and manipulating the levers. It is advisable to equip the seat with a soft pillow, so as not to turn the work with the trailer into a real test of the body's endurance to shaking.