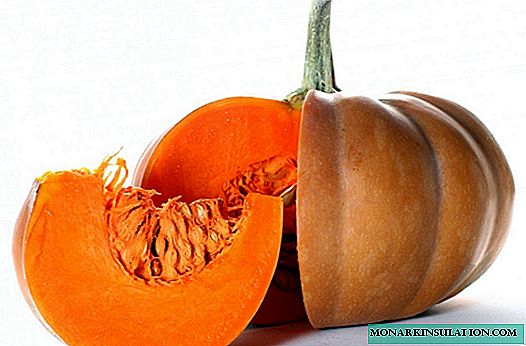
Pumpkin is planted in the garden with both seedlings and seeds. Of course, if possible, prefer the easier way. Sowing pumpkins of any kind with seeds is possible in the south, and in the middle lane it is problematic only in the case of nutmeg varieties. If you properly prepare the seeds and sow them in time in the garden, you can grow a wonderful crop of these very large vegetables.
Selection and preparation of the place, soil
Pumpkin grows in the form of a large bush, and most varieties also form long lashes, which spread in all directions for 2-3 meters or more. Therefore, it’s problematic to allocate a good plot for her in a small cottage, and the owners have to cunning, allocating housing to pumpkins in old barrels, large bags or on compost heaps. If they plant it on ordinary beds, they often provide a "second floor" for arranging lashes and fruits in the form of awnings or floorings over the beds so that a place for planting and other vegetables can be allocated nearby.
Since a pumpkin, like cucumbers, loves to climb any vertical obstacles, it is often planted next to the fence. If she herself refuses to let him scourge him, she just needs to help a little, and then the growing fruits will hang on the fence, like toys on a Christmas tree. True, so that they do not fall, the fruits also have to be firmly tied to a support. And since it is enough to plant only 3-4 plants for average year-round consumption for an average family, the problem of space for pumpkins with such approaches becomes not very significant.

Pumpkins love to grow on various supports: both of natural origin, and specially built for them
When choosing the location of the garden, it is important to ensure that it is well lit by sunlight: in partial shade, plants feel worse. But the composition of the soil is of great importance: pumpkins take out a large amount of nutrients from the earth, and without high-quality fertilizers, the crop will be scarce. True, only 1 m is required for one plant2 well-fertilized area, therefore, this issue is completely resolved.
The best soils in composition are light sandy loam of a dark color with an acidity close to neutral (the pH of the soil extract is 6.5-7.0). Pumpkin should not be planted after any kindred cultures (zucchini, squash, cucumbers). If a pumpkin is planted on a flat horizontal surface or in a low bed, it is possible not to dig the site completely, but just dig and fertilize the holes in the places designated for sowing. True, these holes will be more like planting pits: each plant must be provided with an almost full bucket of humus and a half-liter can of wood ash. Mineral fertilizers are best applied during top dressing.
Often a pumpkin is planted directly on compost heaps that are not yet fully ripe, or specially prepared for it are large pits or trenches (up to half a meter deep) that are filled with various garbage and waste (small branches, grass, tops, manure), mixing them with the ground . In spring, pour these pits with warm water with a small addition of nitrate (up to 20 g / m2), and by the time of sowing the seeds they are well warmed up due to rotting of the organic mass.
Video: sowing pumpkins at the fence
Seed selection and preparation
A wide selection of pumpkin seeds of various varieties is presented in stores, but gardeners planting pumpkins annually usually use seeds from their crops, only occasionally buying beautiful bags of unknown varieties for fun. This makes sense: unlike many other crops, it is very easy to collect pumpkin seeds, they are perfectly stored, and the quality of the fruits of the old deserved varieties is quite high, and it is not always worth spending money to buy seeds. But if the seeds are bought in a store, most likely they should be trusted so much that you do not have to spend time preparing them for sowing; moreover, often seeds from well-known companies are already fully prepared; they simply need to be "put to the ground" in a timely manner.
How to collect pumpkin seeds
Not always the pumpkin has time to fully ripen in the garden, and some late-ripening varieties "reach" during storage. Unfortunately, this applies only to the pulp: if the seeds did not have time to ripen under natural conditions, they will be unsuitable for sowing. For seeds, you can use only fully ripened pumpkins in the garden. These should be healthy specimens, uniform in color, of the correct shape and size, characteristic of a particular variety.
If the cultivation of pumpkins for seeds is carried out purposefully, then under the appropriate bushes it is not necessary to add extra fertilizers, this slightly reduces the growing season. Since pumpkin plants are easily pollinated, it is undesirable to have nearby plantings of other varieties of pumpkins, zucchini, and even cucumbers.
Seed pumpkins up to the extraction of seeds from them even need to be stored correctly. They should not be cut right away, they should be allowed to lie down at room temperature for about a month. It’s not worth it longer: the seeds can begin to germinate already inside the fetus. If you miss this moment, you have to say goodbye to the seeds.
Unlike watermelon, pumpkin seeds are not distributed throughout the fruit, but are in the seed chamber, which in different varieties is located either in the center or on one side, but in any case it is large. Therefore, cutting a pumpkin, you can not be afraid to damage a lot of seeds, but nevertheless it should be done carefully, after washing the pumpkin and wiping it dry. You need to use a sharp, durable knife and do not stick it deep.
Usually the seeds are easily separated from the pulp, but some of them, especially not fully ripened, can be very surrounded by it. If possible, they are separated from the pulp manually, folding into any container, and then washed well with running water at room temperature. Sometimes a sieve has to be used to separate the seeds from the fibers. Bad seeds can be separated right away, flood everything extracted with water: that which has surfaced is thrown away.

Pumpkin seeds are familiar to everyone: they are large, and it’s easy to work with them
After sorting the seeds, they are well dried at room temperature and sent for storage. It is best to keep them in a paper or linen bag, but most importantly - at a constant room temperature and low humidity.
Shelf life of seeds and germination test
Proper storage of pumpkin seeds guarantees their germination for 7-8 years. Moreover, one should not try to plant last year's seeds: they give the best results in germination and yield upon reaching the age of 3-4 years. Many seeds are always collected, therefore, before preparing them for planting, you just need to manually calibrate them by choosing the largest and most dense, pot-bellied ones.
If there are doubts about the correct storage, you can check the seeds for germination. To do this, take as many seeds as they can afford, but at least a dozen. Germination is carried out in the usual way: on a plate spread a napkin or piece of cloth, lay out the seeds and pour enough water so that they are only covered with it. They put the plate in a warm place and make sure that the napkin is wet all the time, gradually add water.
The seeds swell first, then burst a little at the tip, and from there the tail is shown. True, this can happen in three days, and in eight. Therefore, the experiment is completed in ten days. If only one out of a dozen seeds does not germinate, excellent. If 2-3 is normal. Otherwise, it is better to purchase new seeds, although if every second sprouted, you can sow them, but with a margin.
Video: checking pumpkin seeds for germination
Soaking and germinating seeds
Pumpkin seeds are often planted dry, right from the bag. Sometimes it even says on the package that they are ready for sowing. Their seeds are often soaked before sowing, or even germinated. It is difficult to argue whether this makes much sense, but for several days the readiness of the crop brings such preparation closer. In addition, germinated seeds become not so tasty and attractive to pests, which means that the percentage of germination is increased. But even if you prepare the seeds for sowing, the first step should be their disinfection - a half-hour bath in a dark solution of potassium permanganate.
Then the seeds are kept for two hours in hot water. It is advisable to find a way at home to maintain the temperature all this time (50 ± 2) aboutC. If after such warming the seeds are placed in a damp cloth, they should hatch no later than 3-4 days later.

Do not wait until the tails become long, they can be broken off when sowing
As soon as small tails of individual seeds appear, all soaked seeds in the same cloth are sent for hardening in the refrigerator, where they are kept for 3-4 days. A more effective way of hardening is the effect of variable temperatures: the location (in the refrigerator and outside it) is changed with a frequency of 12 hours. Some gardeners dust seeds with wood ash before hardening. Especially diligent, instead of germinating on tissue, germinate seeds on important sawdust.
How to accelerate seed germination
Germination of pumpkin seeds is far from the only step in preparing planting material for planting. There are several more equally effective and not very complex techniques, for example:
- warming up is the easiest way in which the seeds are laid out on a well-lit window sill in clear weather and warmed by the sun's rays all day, performing this treatment for at least a week. Instead, you can warm them 3-4 hours at a temperature of 60 aboutFROM;
- treatment with fertilizer solutions: it can be just an infusion of 2 tablespoons of ash in a liter of water or a more complex mixture, made up by adding 0.5 g of boric acid to this infusion, the same amount of zinc sulfate and copper sulfate. Seeds are kept in solution for 5-7 hours;
- treatment with biostimulants: in this capacity, it is easiest to use a solution containing 0.5 g of salicylic or succinic acid in 1 liter of water. An excellent natural stimulant is the juice of the agave, which is diluted with water in a ratio of 1:10. In such solutions, the seeds are also incubated for 5-7 hours. It is believed that this not only improves and accelerates germination, but also increases the quantity and quality of the future crop.
Possible reasons that the seeds do not germinate
Problems with the germination of pumpkin seeds are extremely rare. If you have previously checked the seeds for validity, they are simply obliged to sprout. Maybe not in 4 days, but in 10-12 days, but they will rise! Especially if they were sown dry. Paradox? Not. The reason that suitable dry seeds did not germinate is perhaps only one. They were eaten by pests. Either underground spider bugs, or birds unearthed.
But with soaked or sprouted seeds is more difficult. If after sowing it has sharply become colder, and the soil temperature has dropped below 8 aboutWith, it means that your seeds, which were just starting to live, simply died from the cold. Well, if there was no cold, perhaps they simply dried up: if germinated seeds are sown, conditions must be created in the hole of sufficient heat and high humidity.
There are many examples of when one gardener was shaking over seeds, spent a lot of time, waiting, but there were no seedlings. And the neighbor arrived at the weekend, buried dry seeds, and they sprouted beautifully. Unless, of course, the ground was warm and moderately moist. Therefore, it is worth recognizing that preliminary preparation of seeds is not very necessary for a pumpkin, and sometimes it only interferes.
Rules, terms and schemes for planting pumpkin seeds in open ground
Pumpkin seeds are guaranteed to germinate only in soil heated to a minimum of 12-14 aboutC, but before sowing, you need to be sure that serious colds will not return: seedlings die at 1-2 degrees of frost. The best temperature for the development of pumpkin plants, the nucleation and growth of fruits is 20-25 aboutC. Therefore, the timing of sowing seeds must be determined, focusing not only on long-term observations of the climate, but also on the current weather.
Roughly in the middle lane, the time for sowing seeds begins when May exceeds the middle, but in this case each hole with crops should be covered with glass or film: the threat of frost remains in early June. If you wait for the summer, then you can not get ripe fruit: after all, the growing season even in the most early ripening pumpkins exceeds three months. In the northern regions, pumpkin in open ground is grown only through seedlings. In the south by seedling, it makes sense to grow only the latest varieties of nutmeg pumpkins, all the rest are sown with seeds in early May, and sometimes somewhat earlier.
The scourges of most pumpkin varieties spread very far across the site, and if they are not supposed to be raised to supports, very large gaps must be left between the plants so that the plants are spacious and not very intertwined. And even with vertical cultivation, the holes are located no closer than a meter from each other: the minimum possible feeding area for one plant is exactly 1 m2. But for comfortable growth, experts recommend a more free placement of pumpkins, according to the 2 x 1 m scheme, having one plant per hole, or 3 x 2 m, in which case two plants can be planted in the nest.
Sowing seeds is not difficult, even for an inexperienced gardener.
- In the selected places, dig deep holes, make fertilizers in them: at least a bucket of compost or rotted manure and a half-liter can of ash, mix the fertilizers with the soil and water well, spending at least 5 liters of water.

Fertilizers with soil must be mixed very carefully.
- Having scooped up a hole with a depth of 6-8 cm, 2-3 pumpkin seeds are laid out in it.

Seeds should be laid out so that when removing extra seedlings do not disturb neighboring
- They fill the seeds with earth, ram them by hand, make small sides of the earth or plates on the edges of the hole and cover with glass or film until seedlings appear.
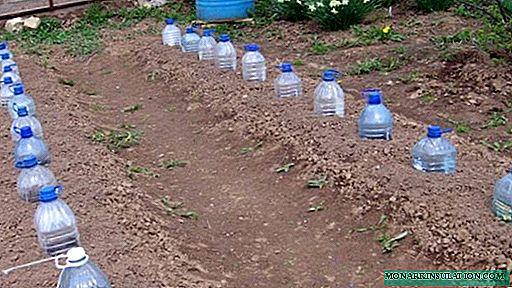
With the modern version, plastic bottles are great for covering the holes with seeds


At normal temperatures and soil moisture, seedlings appear after 5-8 days. When it becomes clear that the frost will not return, the film can be removed. But in not very warm regions, many gardeners cut holes for sprouts in it, and the film is temporarily left in the garden so that the soil does not cool down. After 3-5 days, the extra, weakest shoots are cut off: it is better not to pull them out so as not to harm the roots of the plants remaining in the hole.
Video: planting pumpkins sprouted seeds
Plant care
Caring for a pumpkin in the open field is not difficult and consists mainly in watering and feeding. True, it would be nice to form plants in time, too, but without this you can get good results. Weeding and loosening are possible only at first, until the bushes grow. At this time, they try to water after shallow loosening so that the water penetrates deeper to the roots.
Watering should be carried out only with water warmed up in the sun, so it falls on the evening hours. Pumpkin for fruit setting necessarily requires moisture during intensive flowering, as well as during the rapid growth of pumpkins. Up to three buckets of water have to be spent on each bush. As soon as it is noticed by the fall that the fruits have stopped growing, watering is greatly reduced: this is necessary for the set of sugar content during ripening. The pumpkin will find the necessary moisture at this time itself: after all, its roots penetrate deep into the soil up to one and a half meters.
It is necessary to feed infrequently: after all, the hole was well fertilized in advance. For top dressing around the bush, a shallow trench is made with a chopper, where the nutrient solution is poured. The first time it is worth doing when growing 5-6 leaves, the second - when the lashes grow to about half a meter. Fertilizer can be either azofoska (10-15 g per bush) or mullein infusion (based on a bucket of dry fertilizer for 6-8 bushes). Periodically around the bushes it is worth scattering wood ash with a thin layer.
After reaching the main stem with a length of one and a half meters, pinch it, and leave 2-3 pieces from the growing side shoots, on each no more than one fruit will grow. If you leave a larger number, they will also grow, but they will be smaller and worse quality. A small plank or piece of plywood is placed under each growing pumpkin so that they do not decay from contact with the ground. To improve the fruits and provide them with better nutrition, the whips are sprinkled with a small layer of soil at a distance of about 50 cm from the main shoot.
Sowing pumpkins in the beds with prepared or dry seeds is extremely simple, but not possible in any climatic region. Many varieties grow well and give a ripened crop, if you sow the seeds correctly and on time. Most modern summer residents have no time to deal with seedlings, and they go the easier way, often achieving good results.