There is one feature on my plot - a trickle flowing from collective farm fields. In order to somehow fit it into the surrounding reality, as well as to ensure a safe transition, a bridge was thrown over it. It was made of wood about 10 years ago, so it already rotted in order and lost its former strength. It seems from the outside and looks organic, but it’s already scary to cross it. And let the children all the more! Therefore, I decided to remove the old bridge and build a new one - from metal. I would like to bring a detailed description of this construction to your court.
I immediately decided on the design of the new building - the bridge will be humpbacked, with bent metal handrails and wooden flooring. I found a suitable drawing on the Internet, redid it a bit to existing realities. Then, along the way, some profiles were replaced with others, sizes varied. But in general, the project turned out to be working and was implemented.

Bridge design in the working drawing
Step 1. Acceptance of blanks and welding of the sidewalls of the bridge
Bent parts of the structure were ordered from local craftsmen. Unfortunately, they were not entirely responsible, so I had to bring some details to my mind on my own. I will mention this later.

The brought blanks of bent elements of the bridge
So, brought the details, unloaded. For the handrails, I picked up 4 arcs, the most similar in shape. It turned out to be not so simple - they were all different (thanks, to the “masters”!). I do not have a workbench for such structures, so I started to cook sidewalls on a paved area.
He simply laid out arcs and vertical racks on the surface, he achieved horizontality by placing various pieces of wood and plywood under them. It turned out to be quite convenient. Checked at the laser level, everything is smooth, no "screws".

Connection of bent handrails with vertical racks (by welding)
I welded the first side, then laid out the elements of the second side on top of it and also connected them by welding. The lower part of the bridge supports will be underground, they will not be visible, so I made these parts from a corner. I had a lot of dust in my workshop, I have nowhere to put it, besides it’s a pity to use pipes for underground parts.
He welded all kinds of metal trimming fangs to his feet to better support the supports in concrete.

The frame for the side of the bridge is welded

On the racks to be concreted, “fangs” of metal scraps are welded
Step 2. Destruction of the old
It's time to dismantle. For a couple of hours, an old wooden bridge was dismantled, which had deteriorated. The place for the new bridge has been cleared.

Old wooden bridge

The old bridge is destroyed, the place for installation is freed
Step 3. Connection of sidewalls in one design
On a wheelbarrow to the brook, I brought up almost ready-made sidewalls and various profiles necessary for the construction. In place, welded to the sides of the scarf and the main elements of the flooring retention. Brewed all the voids, which theoretically can get water.
I did not spare the electrodes, since the quality of welding of the holding parts depends on how safe the movement on the bridge will be. I didn’t clean the seams, I thought that they wouldn’t be visible anyway. And the extra work is useless.

Welded holding elements for flooring

Two sidewalls of the bridge are welded into one structure
For rigidity, weld buttresses on the sides. As for me, they do not look very organic against the background of curving sidewalls. Too direct, sharp, in general, not quite what I wanted. But rigidity requires sacrifice. Let those remain.

Buttresses serve to increase the rigidity of the structure
The lower parts of the bridge supports will be in concrete, I covered them with paint - later they will no longer be accessible.
Step 4. Installation of the bridge and concreting of supports
And then he started drilling wells. He took a drill and drilled 2 holes on both sides of the stream for almost the entire depth (per meter).

Four holes drilled for bridge supports
He put up the structural supports in the holes, aligned them vertically with the building level. For rigidity of the installation, I filled the empty space in the holes with rubble stone. Now the supports stood like a glove and did not move anywhere.
Next is concrete pouring. At first I made a liquid batch so that concrete would leak out between the stones without any problems. The next batch was already thicker. I don’t know what, in the end, the concrete grade turned out to be, but I’m sure that the bridge on such a solution will stand for many years and will not budge.

The bridge is installed, its supports are concreted in the holes
Step 5. Welding of internal arches and balusters
First, I welded internal arcs to the sidewalls.

Internal arcs are welded to the vertical struts of the sidewalls of the bridge
Between them, in accordance with the plan, racks-balusters should be located. They had to be measured in place and only then cut off - not one was the same. Step by step, I welded all the balusters.

Balusters are fixed in their places - between the internal arcs
Step 6. Correction of the bent elements of the handrails
It would seem that the metal elements are over, but it wasn’t there. One flaw made by my irresponsible masters bending metal did not give me rest. I mean the curved ends of the handrails.

The bent ends of the handrails did not withstand any criticism.
They looked just awful, therefore, without thinking twice, I cut them. And then I decided to do it myself, in a more decent performance.

The ends of the handrails were cut
I do not have a bending machine, it is irrational to make it or to buy it for these purposes. The only way that seemed acceptable to me was to cut the notches on the pipe pieces and bend the metal along them.
At first, I calculated, taking into account the difference between the internal and external lengths of the arcs, the number of notches and their width. On the pipe cuts, I marked the location of the notches with a step of 1 cm. I cut it first with a circle of 1 mm, and then cut it (not completely) a little wider - around 2.25 mm.

Notches made on metal pipes
It turned out something like a washboard, which could already be bent. I did this, fixed in the necessary form and made from the outside. I didn’t touch the inside, I didn’t want to suffer from mopping up later.

Thanks to the notches, I managed to bend the blanks and give them the desired shape
Since the initial blanks of the ends of the handrails were taken with a margin, after trying on the spot, the excess part of the pipes was cut off. The blanks were welded to the handrails.
I decided to brew open ends too, so as not to put plastic plugs. They would look alien and cheap on the metal structure. After welding, the bent parts were carefully brushed to a shine. The result is excellent, almost perfect handrails!

Bridge with welded bent ends of handrails
To protect the banks from erosion, it was necessary to strengthen them with pipes and boards. All these reinforcing structures will not be visible, so I did not strive for special beauty. The main thing is that it turned out reliably.

Reinforcing structures to keep banks from erosion
Step 7. Putty and painting
The time has come to correct another defect made by the manufacturers of metal billets. Some profiles were substandard, with noticeable dents. It had to be removed somehow. Car putty for metal came to the rescue - I had 2 types.
First, I filled the deepest dents with coarse putty with fiberglass, I used the top putty on top. At the same time, I putty with the finish and putty on the inner surfaces of the ends of the handrails (where there was no welding). We had to work quickly, since the putty freezes at one moment. I hesitated a little and everything was already frozen, I had to make a new batch.

Irregularities and dents were covered by car putty
Now the metal surfaces of the bridge seem almost perfect. You can paint. I chose the classic color for the design - black. All metal surfaces were painted in 2 layers.

The metal parts of the structure are painted black - a completely different look!
Step 8. Installation of wood flooring
The time has come to lay a bridge with a board. In the barn for several years I had a very high-quality larch board with a ribbed velvet surface. I decided to use it.

The board has a ribbed surface - the flooring will not be slippery
Unfortunately, larch has one unpleasant feature. When dried, it releases sharp chips that can easily be scratched and injured. Pulling the boards from the barn, I saw that this time the entire front side was strewn with such slivers. The flip side turned out to be at its best, so it was decided to use it as the front for flooring.
Boards needed to be prepared. I treated them with a priming antiseptic - from decay and to increase the life of the product. I dried it. And then covered with used engine oil. There was an idea to varnish the flooring, but I did not dare. Still, there is a high probability that the varnish will crack in wet conditions.
I did not want to endanger the work of many days. Therefore, I settled on antiseptics and oil - this should be enough for several years of operation. However, I plan to update the oil layer every year so as not to worry about possible problems with decay.

Boards are dried in an upright position after treatment with antiseptic and oil
Then I screwed the boards to the horizontal floor holders with the help of metal screws. He left a small distance between the boards so that the water that entered could drain into the stream and did not linger on the floor. Still, wood flooring remains the weak link in the bridge and it is necessary by all means to prevent the possibility of decay in existing wet conditions.
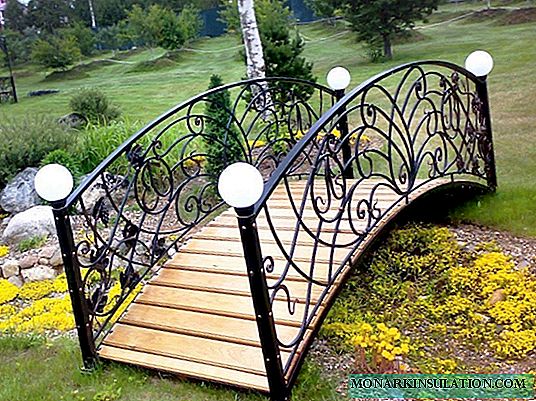
The result was a good humpbacked bridge, you can use it without fear. And to pass without soaking your feet is possible, and a decorative function is present.

The final look of a humpbacked metal bridge with wooden flooring
I hope my master class will not be useless and useful to someone in landscape art - I will only be happy!
Ilya O.