Pebbles - smooth rounded pebbles polished by the sea, are today a very popular material for garden decor. It looks attractive and aesthetically pleasing both as a material for a garden path or patio, and as a decoration or basic material for a fence. Some owners of private houses pebble entire yards, creating a strong, durable, beautiful coating. Selecting stones by color, shape, size, skillfully combining them, you can create amazing patterns. What can be made of pebbles in your garden? Let's look at a few simple examples.
Example # 1 - decorative pyramid
The pyramid is made very easy, this design can be placed in a flowerpot, flower pot, make a few pieces for the flowerbed.
You will need pebbles, the size of which is gradually decreasing, like the rings in a children's pyramid, as well as glue. A smaller stone is glued to the largest flat stone, which will be the base of the pyramid, the glue should dry, then you can move on to the next stone, etc.

For the base, a wide flat stone is taken, it is dug into the ground so that the pyramid is stable. Upper stones may be pointed, irregular in shape.
The pyramid is dug with the base in a pot or in the soil on a flowerbed, it looks very original.

Pebble pyramid - an original garden decor that will attract attention. Such a design among green plants looks very peculiar and organically
Example # 2 - pebble flower pot
In order to "sheathe" a pebble flower pot, it is convenient to use a cement mortar. Pick up the pebbles about the same size and stack them with an edge. Small stones can also be fixed with a base. A layer of cement can be painted, or painted in some one or several colors of the pebble itself - here it is at your discretion. As a base, stand for the pot, a large flat boulder is suitable, if you find one. Plants in such pots look attractive and natural.

Pebbles of various colors, rather large, are used to create this pot. In order to veneer a small pot, pick up small pebbles (flat or peaked). A few of these pots with green plants will help create a wonderful composition.
Example # 3 - pebble rugs
To lay a path out of sea stones is quite complicated, but to make a rug out of them is simple, and it looks great. You will need flat pebbles of approximately the same size, glue, carpet (preferably thin), a knife.

First you need to place the stones on the carpet without glue to create a flat surface, then you can proceed to gluing each individual pebble
Choose stones of the same thickness from your collection to step on the mat is convenient. Then you need to cut a piece of carpet of the right size (you can use the old carpet, track). We place stones on the fabric, laying them out so that the coating is smooth, harmonious. For gluing, silicone glue is used. Glue is applied to each stone, and then the pebble is placed in the space provided for it.

Necessary components for creating a rug: carpet, glue, knife and flat pebbles. Such a rug can be used both in the garden, and at the entrance to the house, and in the interior. You can also make stands for garden service
When the glue dries, the mat is ready. It can be put at the entrance to the gazebo, at the bench. If you want to place it in the yard, you can use a rubber mat as a basis, and glue on rubber. Such a pebble rug will not be afraid of water. Having shown imagination, you can create a real masterpiece using paints, stones of different colors, laying out patterns.
Stones can be decorated with painting. Ideas and technology secrets: //diz-cafe.com/dekor/rospis-na-kamnyax-svoimi-rukami.html

To create this rug, pebbles of the same size, a wide variety of natural shades, were used. You can try to lay out a simple geometric pattern using larger or smaller pebbles, you can color it - working with sea pebbles is doubly nice, because you can create whatever you like
Example # 4 - a basket of sea stones
To create a decorative pebble basket you will need the following tools: two small plastic pots of the same size, scissors, a plywood sheet (10 mm thick), a pencil, a jigsaw, a transparent film, a hammer, several nails, frost-resistant and moisture-resistant cement glue, a small flat pebble (about 200 pieces, length - 3-4 cm), nippers, putty knife, brush, wire mesh.
So, let's get to work. First, cut off the rim from the top of one of the pots (width 2.5 cm). We squeeze the rim so that an oval is obtained, apply it to a piece of plywood, draw a contour. Then the figure obtained on plywood is cut out with a jigsaw. The rim is put on a plywood oval, attached to it with nails along the edges of the plywood. This is the template for creating the base of the basket.
The base is laid out with a film, its edges should protrude on the sides. The mold is filled with a layer of cement mortar with a thickness of 10-12 mm. The wire mesh is adjusted to the size of the mold, pressed into the cement. The basket is a garden decor, you will probably want to plant some flowers in it, so you need to make holes for drainage in the base.
Cement glue is applied to the flat side of the pebbles and they are glued to the base. When you glue all the stones to the base, leave it to freeze overnight. After drying, the plastic rim must be removed and the finished base separated from the plywood. Turn it over, remove the film.

The picture reflects the first 4 stages of work: we create a template for the bottom, fill it with cement, use a mesh and a film and start laying stones
Now we will be engaged in "laying the walls" of the basket. We put glue on the stones and lay out the first row along the edge of the base. The rest of the rows are laid out in the same way, only with a large coverage, otherwise the walls of the basket will not be inclined, but straight.
After you make five rows of masonry, let the glue dry for half an hour, you can back up doubtful places with a mug for fidelity. Excess cement should be removed prior to hardening. To remove, you can use a narrow spatula, a tool for sculpting, and clean the surface of the stone with a brush.

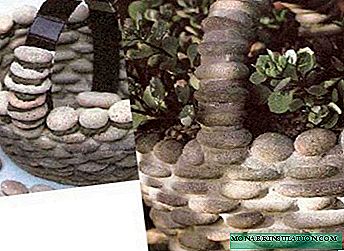
The base is ready, now we are starting to create a “masonry”, to lay out the last row you can use round pebbles, as in this case, or pick up pointed ones
Then another 2-3 rows of pebbles are laid out, the last row, in order to give the product originality, can be laid out with round pebbles. After laying, leave the basket to solidify for a couple of hours.
Now you need to make a pen. Cut the rim from another plastic pot and skip it in the center of the product, the handle should protrude above the upper edge of the basket. The handle is laid out with flat stones edge, take more solution to create the handle. Spread the stones at the same time on both sides, the latter should be in the middle. Dry the solution, remove its excess. After a few hours, when the solution becomes hard, carefully remove the plastic bezel, clean the handle from the bottom.
To decorate the suburban area, you can even use trash. How exactly: //diz-cafe.com/ideas/ukrasheniya-iz-staryx-veshhej.html
A pebble basket will look great on the terrace, at the entrance to the gazebo, in any other corner of the garden. If you don’t surprise anyone with flowerpots and pots, such a small form will inevitably attract attention
Please note that it is better not to take the basket by the handle - in any case, this part of the product will be the most fragile.
Example # 5 - pebble track
A pebble path can be of two types: with a loose embankment and with fixed stones.
Loose mound track
The first option is much easier to make, but it does not look so impressive. To create it, you will need pegs, plastic limiters for paths, rakes, a shovel, fabric used in landscape design, pins, pebbles, gravel.
So here we go. On the prepared site, mark the boundaries of the track (you can use a hose, pegs), it is convenient to make the width no more than 80-100 cm.The turf is removed along the perimeter of the track, trenches of about 15 cm deep should be dug on the sides. Limiters of the area of the future track should be installed in them. If the track will have convolutions, use additional corners - they will maintain the integrity of the structure. The cheapest limiter is made of plastic, but you can also use forged, concrete, wooden, which look much more attractive. After installing the curb, dig a trench and strengthen it. The surface level on both sides of the guard must be 3 cm lower.
A special fabric is placed in the recess. The corners can be fixed with a stop, in this case, the curb is fixed after laying the fabric, or pressed with flat stones. The fabric will protect the track from weeds. The resulting track base is filled with a mixture of gravel and small pebbles, leveled with a shovel or rake. If you need to add stones in some places, do it. Hose the path - the gravel will become cleaner and the embankment will settle and level out a bit.

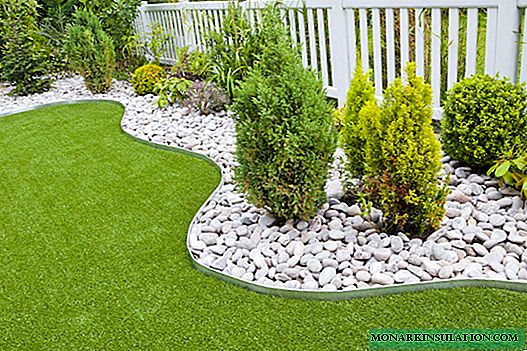
Creating such a path is quite simple, and if you decorate it with any of the described methods, the garden will look modern and attractive
The track is ready. To make it look more attractive, you can install solar lights at the edges, plant flowers, make a lawn - at your discretion. Caring for such a path is simple - from time to time you will need to remove weeds and debris.
Track with fixed stones
On a pebble track with clearly fixed stones, you can create a wide variety of patterns, ornaments, drawings, use different colors, bright colors. Pebbles today are becoming more and more popular material - it is used both in landscape design and in interior design. This material can be bought, and if there is an opportunity - to bring from the sea coast.
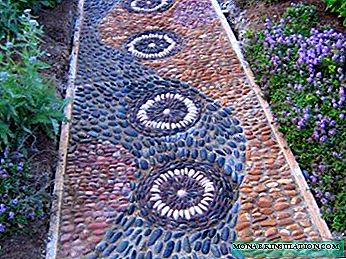
An example of a combination of stones: a successful combination of blue and brown. The drawing of the “wave”, the current stream, was created using stones laid out by the edge. Harmony is also created by flowers of a lilac shade that go well with the color of stones

Of course, such beauty is the work of a real master, but you can try to create mosaic elements as well. To begin with, you can practice by laying out a pattern according to a drawing in the sand
To begin with, decide what patterns you would like to see on your path, in the article we give several examples, but the Internet offers even more choices today. Sort the stones by size, by color, think about whether you plan to use paints.
The basis of the track is a pit 15 cm deep dug around the perimeter. Pebbles can be located flush with the ground, and slightly higher. The bottom of the pit is covered with a layer of sand and stone chips (about 2 cm). Then, raw concrete mix (5 cm layer) is laid out on the sand. Moisten the concrete if it is dry.
Now we work with pebbles. In the absence of experience, practice laying stones in the sand. When creating a pattern in the shape of a circle, mark the center and edges on the track, start laying out from the center. Stones can both fit snugly against each other, and laid out at a certain distance. In the center of the circle, the pebbles should touch tightly. When creating a circle, the stones are placed edge-on. The surface is leveled using a level, the pebbles are rammed with a rubber mallet. A third of the height of the stone should be in the concrete layer. The border can be done or not done, but if you make it, the track will be stronger.

Spreading the track is troublesome and time-consuming. You can use a separate element of pebbles, a kind of interspersed - as in this case on a path made of wild stone
The finished track or paved area should be poured with water, covered with foil and left overnight. The next day, we fill the concrete with cracks between the stones - no more than 2/3. We moisten the dried up concrete again, with a brush we clean the necessary places.

Amazing things can be created by combining sandstone and pebbles. Using colors, this track looks fantastic.
After that, the track is again covered with tarpaulin, now it needs to be left covered for several days. In general, in order for the mixture to set well, it is advisable not to walk on the new track for a couple of weeks. If cement remains on the stones in some places, clean them with a damp sponge.
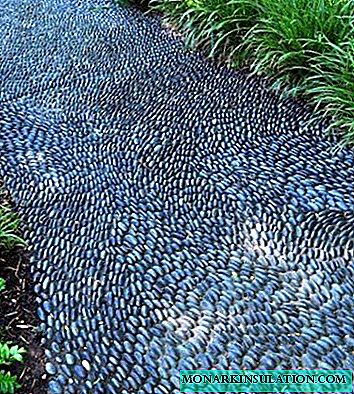
A path with the effect of a dry stream - all pebbles are laid with an edge, a different angle of spreading creates the impression of water moving, as if it were not a path, but a real stream or a small river flowing through the garden
If everything worked out well for you, you can try more complex patterns in another section or track. Having made a pebble path with patterns, you yourself will see how beautiful it is and how your garden will be transformed.
Curious to know! How to use luminous stones for landscaping: //diz-cafe.com/dekor/svetyashhiesya-kamni.html
Walking along such a path is not only pleasant, but also useful. If you walk on it barefoot, it will act as a massager. Pebbles massage all the active points of the foot, so such a man-made beauty will make you healthier.