The arrangement of any suburban area begins with the erection of a barn - a building necessary for the storage of building materials, firewood and other household equipment. To build a barn with your own hands is a simple and quite feasible task, which can be realized by any owner who is at least a little versed in construction. Since the barn is not a temporary structure and is a multifunctional structure that can not only be used to store the necessary things, but also for keeping domestic animals, you should carefully consider the location of the future building.
Choosing a place for future construction
To facilitate the work, you can first draw up a plan with a designation of places for future buildings. For the construction of the barn, many owners allocate a plot away from the front zone, so that it is hidden from prying eyes. Some are of the opinion that the shed should be placed closer to the house, so that at any time to have access to it. In order to rationally use the territory for arranging the shed, a little sunlit area is selected, which is considered the least suitable for growing crops and other agricultural work.

Deciding on the location of the barn is undesirable in a hurry. After all, the barn, which will serve more than a dozen years, should complement, and not contrast with the landscape of the area
When choosing a place to place a shed, you should focus on the location of other areas of the site, as well as on the dimensions of the structure being built and its appearance.

With the help of finishing work, you can even transform an unsightly hut into an original design building, which will become a spectacular decoration of the site
Decide on the design and exterior
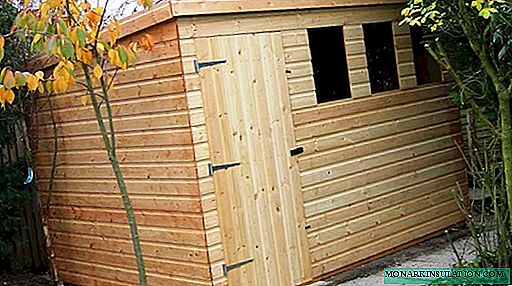
Before proceeding with the construction of the barn, it is necessary to consider the shape, size and appearance of the future structure. The appearance of the building can be absolutely anything, starting with a simple small house without windows and with only one door, and ending with unusual designs that, in addition to their direct purpose, can serve as an element of landscape design decor.

The simplest option is the construction of a shed measuring 2x3x3.5 m with a shed roof, which is covered with roofing material or roofing
Such a barn can be built from ordinary unedged boards in just one or two days. The main advantages of the design are low cost and ease of construction. To transform the unsightly appearance of the building, you can plant climbing plants along the wall, or decorate the walls using decorative elements and flower pots.
Gable roof sheds look more attractive from an aesthetic point of view. Especially if the roof is equipped not with a banal roofing material, but, for example, with bituminous tiles.

If, in addition to the kit, the walls are also finished with siding, then the usual unsightly shed can be transformed into a modern garden house

It is possible to build a combined shed, which can be used as a room for storing tools, as well as a greenhouse or greenhouse
The choice of materials depends on the functional value of the building. Basically, the sheds are all built of wood. But in order to create a more durable and reliable structure, which will last several decades, you can build a shed of foam blocks or bricks. Brick sheds are well suited for raising poultry and animals throughout the year. But such a structure should be erected on a shallowly buried foundation.
A step-by-step example of the construction of a frame shed
To begin with, we offer to watch the video, and then read the explanations to it:
Stage # 1 - ground preparation
Any construction begins with laying the foundation. Before proceeding with the construction, it is necessary to mark the site for the construction of the building with the help of a tape measure, pegs and rope. It is important to measure with a tape measure not only the sides, but also the diagonals of the marking.
The shed can be erected on a slab, tape, columnar or pile-screw base. On ordinary non-heaving soils with a low occurrence of groundwater, a columnar foundation is most often laid.

For the construction of a columnar base, it is necessary to prepare pits every 70 m deep at a depth of about 70 cm at the intersection of the enclosed area, as well as at the intersection of the internal walls of the building, for installing brick columns or asbestos pipes
The installed columns must be checked according to the level, and then fall asleep 15 cm with a layer of sand and gravel and concreted. After that, let the foundation stand for several days.
Tip. To extend the service life and increase the waterproofing of the columns, you can process them before filling with special mastic. It will take no more than a couple of two-kilogram cans of waterproofing material to process all the foundation pillars.
Stage # 2 - installation of a frame of wooden beams
Pre-bars should be treated with protective impregnation and an antiseptic. When acquiring a protective agent, it is better to choose impregnation with a color scheme, when working with which untreated surface areas will be better visible.

A foundation of timber is laid on an established foundation, the size of which corresponds to the size of the frame of the structure being built. Bars should be laid on columns covered with roofing material
Planks 30-40 mm thick are laid on the equipped floor frame. When laying out floorboards, the main thing is to carefully measure and saw out areas around the uprights. Having laid the floor at this stage of construction, it will be easier to mount the walls.
Planning in the future to level the floor with a planer, it is advisable to use the "secret" method when attaching the boards to the logs. The number of support racks is determined taking into account the number of corners, as well as the presence of door and window openings. To set the bars strictly in level, you can use slopes. Using them, you can temporarily lock the bars in the desired position. When nailing sticks, the nails should be driven in only half, so that it is convenient to pull them out later.

Vertical struts are attached to the bottom harness with lags using pins protruding from the base, self-tapping screws and steel corners
It is possible to erect a frame on a brick base, when several rows of bricks are laid out along the perimeter of the foundation, and then wooden racks are mounted on them.
The bars, which will be placed vertically, can be machined on three inner sides with an electric planer, and on the sides looking inside the barn, the chamfer is completely removed. Only the sides are left untreated, which will subsequently be sheathed by the outer boards.
Stage # 3 - installation of rafters and roof arrangement
The upper part of the frame from the bars with cuts in the middle and at both ends is mounted on the level and fixed vertical posts. All connections are fixed using self-tapping screws and steel corners.
When arranging a shed roof, it should be foreseen in advance that the wooden racks on one side be higher than on the other. Thanks to this arrangement, rainwater at a slope will not accumulate, but will drain.

For roof rafters, 40 mm thick boards can be used. The length of the rafters should be approximately 500 mm longer than the length of the frame
On the rafters, deforestation is done at the fulcrum on the bars. Then they are laid on the rafter frame and fixed with screws. Rafters are placed at a distance from each other about half a meter. The crate can be mounted on a prepared, chemically treated frame.
For covering the roof and walls of the barn, boards measuring 25x150 mm are suitable. A wooden roof needs waterproofing, which can be ensured with the help of roofing material. Wanting to give the roof a more presentable appearance, it is good to use bituminous tiles, slate or decking as the final roofing. The boards are filled first on the front of the structure, and then on the sides and back. They are placed right next to each other.

Having laid the walls of the shed with boards, you can treat their outside with an electric planer. This is necessary not so much for an aesthetic appearance, but rather so that rainwater can easily slide down the smooth surface of the boards
To give the finished building a more attractive look, you can paint the exterior walls of the barn with water-based or oil paint. For more information about the arrangement of the roof of your barn, see here - a single-pitched option and a gable option.
Finally, I want to show how they build in Germany in a review from our German friends: