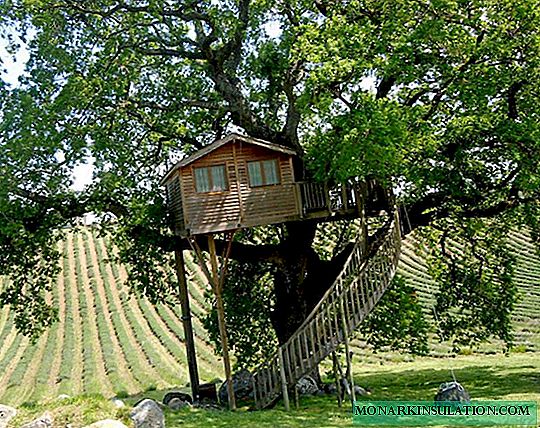
Probably, there will not be a single child in the world who would not want to have his own house, located on the branches of trees. This is not just a place for games - it is a small world with its own laws, rules, traditions. If there are several tall strong trees in the summer cottage, you can come up with a simple project and bring it to life, to the delight of children, and adults too. It remains to figure out how to build a tree house with your own hands.
Options for structures on trees
There are a lot of options for building tree houses. They are being built both for exciting children's games and for privacy with a book under a spreading crown in the summer heat.
In style and purpose there are absolutely no restrictions. It can be an inaccessible tower of the beauty, a disguised outpost, a cannibal castle or a spaceship.

- Watch tower


- Forest Forest


- House for summer holidays


- Shed gazebo

- Dollhouse styling

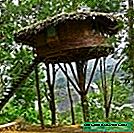
- Traditional home of the Papuans


- In the form of a change house


- Multi-storey castle


- Hunting hut

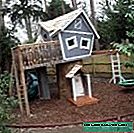
Architecturally, everything is much more modest. There are three popular, proven practice types of structures, these are:
- The construction on the platform. Powerful branches or the trunk itself act as a supporting element, on which the details of the lower floor are fixed with self-tapping anchors. If necessary, the platform is strengthened with oblique beams resting against a tree.
- Frame house on stilts. In fact, this is an independent building, the floor and roof of which only intersects with one or more trunks. The structure itself does not rely on a tree, therefore, does not interfere with life and growth. A similar house is installed on piles, the size of which is determined depending on the upcoming load.
- Hanging platform. Suspended on able to withstand branches using ropes, cables or chains. The simplest, but not too reliable and safe method of organization, especially when it comes to the play area for children.
The first and third architectural types directly depend on the bearing capacity of the trunk, the size of its branches and the root system. After all, the tree will have to fulfill the function of the foundation: to firmly hold the load not only of the structure itself, but also of visitors. It is believed that a trunk with a minimum thickness of 30 cm in diameter, better than more, will be able to cope with this difficult job.
The best breed for building a house is rightly recognized as an oak. Following him in the ranking of suitable trees are beech, maple and large spruce. Before you design a structure and plan actions, you need to carefully examine the object to be used for parasites and diseases. If negative signs are identified, the idea will have to be abandoned.

Three main constructive options for tree houses are used as the basis for developing your own construction project
For the construction of the second constructive variety, using only a crown for camouflage or decoration, the bearing capacity of the tree is absolutely unimportant. A completely young representative of the fauna world will come up, which over time will hide the headquarters of scouts or an alien ship in its lush greenery. Almost all deciduous, coniferous and even garden species are suitable.
Preparation for the upcoming work
We recognize that not all domestic estates possess a suitable tree for building a house. However, suppose that it was your parents who were spared by love of gardening. That selfless and inseparable passion in our latitudes for cultivating every centimeter did not make them uproot such an incomparable object.
Before you start designing and choosing a method, how best to make a house on a tree growing within the site, you should evaluate the real situation. It is necessary to find out if there are any local regulations prohibiting the construction of such structures. In some situations, for such buildings have to get permissions.
If the tree is located next to the neighboring site, you must definitely talk to its owners. It is possible that the design will obscure their favorite flower garden, spoil the view from the window, or frisking kids will cause unnecessary concern to older people. In any case, the upcoming construction should be discussed with neighbors in order to preserve friendly relations.

When designing a tree house, it should be noted that it is unsafe to place it at a height of more than 2.5 m (1). If the trunk or branches can become a reliable support (2), they can be used as the basis for the construction of a house of the first type. The tree must have a sufficiently powerful root system (3)
Suppose that we have no obstacles to constructing a tree house. So, we can safely do independent design, for which we need:
- Choose the safest bottom floor height. It is believed that for children’s games, the treehouse should not be positioned higher than 1.5 m. If you plan to install a gazebo, the height limit can be moved by 2 - 2.5 m. If the structure is to rely on the branched trunk area, then determine the height of her.
- Calculate the optimal area of the lower floor or platform, given that the projection from the building located on the tree should be completely on your site.
- Decide on the design of the house. Decide whether it will be a platform with perimeter fences and a canopy, a structure such as a hut or a small frame house.
- Provide for the likelihood of an accidental fall. It is advisable that the land around the structure is not rammed. Concreted areas are completely excluded, the close location of paved paths is not recommended.
- Consider the most convenient and safe view of the stairs to move the visitors of the house up / down.
If you wish and the presence of constructive prerequisites, it would be good to think over options for operating the zone under the structure. It does not hurt to arrange a shed there to store utensils and items that need to be removed from the rain.

When designing a structure, it is necessary to think over safety criteria, provide for the optimal method of movement and the possibility of using the space under the house
Methods for building a tree house
As a hint to home masters, we will analyze the two most popular methods of building a tree house. They can be fully or partially copied, or based on the above examples, you can develop your own method of construction.
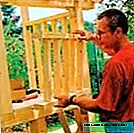
Support frame structure
This is the most humane type of structure, which in principle can be built just next to a tree or without it at all. It is a small frame structure mounted on piles. The roof is formed by trusses of a hanging type, fastened at the top with metal plates. Movement is provided by a fixed staircase installed at an angle of 45º.

The presented version of the house does not rest on the trunk and branches. In order for them to cross the floor and the roof, you just need to make holes in the ceilings (+)
To carry out the frame, a bar 105 × 105 mm was used. For the device of the pile base, the size of the material would not be superfluous to slightly increase, it is permissible to slightly reduce the wall racks. For wall sheathing, it is better to purchase a lining, but plywood is also suitable, it is recommended to buy a grooved board 150 × 50 mm on the floor, edged 100 × 25 mm on the rafters.
From the remains of the edged board, you can build a house for the squirrel. Read about it: //diz-cafe.com/postroiki/domik-dlya-belki-svoimi-rukami.html
If there are no skills in carpentry, then to connect the parts of the frame it is better to buy metal corners and plates. It is the same with boxes in the door and window openings, although they can be made with your own hands, if desired.

In the construction of the house it is easier to use the tried and tested option and the calculated dimensions. Based on an example, you can develop your own project (+)
The roof in the example is made of flexible tiles, under which they arrange a continuous crate of plywood or a board laid with a gap of 3 mm. Still need cement or ready-mixed cement mortar from a factory specializing in its manufacture, anchors and thrust bearings for fastening piles.

Frame parts are easier to connect with metal corners. As an alternative, a half-tree cut is used. When choosing the second option, it should be taken into account in calculating the length of the elements (+)

In the example, an asymmetric rafter system of a hanging type. The rafters at the apex abut against each other, are connected using a toothed metal plate. The lower connection node with the frame strapping is formed by a notch, additionally fixed with nails (+)
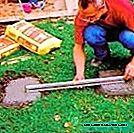
Stages of the device base under the house:
- We mark the site according to the size of the house. We mark the corners of the structure with pegs, connect them with twine. We measure the diagonals of the marked outline, they should be equal.
- In the places where the piles are installed, we form pits with a depth of about 50-60 cm. The length of the sides of the pits is 30-40 cm. The smaller its area, the less the solution will leave, but the more it will be, the more reliable the foundation for the pile will be. Recesses for pouring mortar can be done using a garden drill.
- We compact the bottom of the pits, after moistening the damp sand to increase the density. If the bottom is piled with loam, or wet sand does not need to be moistened.
- Create a pillow under the pile foundation. At the bottom of each pit, pour 10 cm of crushed stone and 10 cm of sand. We ram again.
- Pour cement mortar into one of the pits to about half of the space remaining after filling the pillow.
- Set pieces of metal masonry mesh with a cell up to 25 × 25 × 2 mm on top of the fill. We fasten it with pins or wire directly into the ground wall of the pit. The main thing is that the grid does not move to the bottom, but remains approximately in the middle of the support being arranged.
- We fill with the solution the remaining space in the pit.
- Similarly, we arrange concrete foundations for all piles.
During the pouring of the second part of the solution, we install a dowel for the thrust bearing under the pile. If you don’t put it right away, then you will have to drill a hole in the concrete stone. We will take into account that no more than 45 minutes should elapse between filling the first and second half of the pit, otherwise the support will not be monolithic.

- Pit device

- Grouting


- Installation of a metal thrust bearing

Immediately after pouring with a building level, we check that the surface of the poured supports is at the same height. In the opposite case, it will be necessary to align the thrust bearings, and under them lay chips or trim boards.
In order for the supports to harden, time is needed. According to the rules for pouring foundations for residential buildings, the next works should be started after 28 days. For this period, they should be closed with polyethylene, which must be removed periodically to ventilate the supports.

- Installation of supports in thrust bearings


- Fixing corners to racks


- Installation of beam beams

- Upper Harness Mount


- Harness joining

- Mounting the window frame


- Making rafter template

- Fastening rafters to the harness

- Board flooring

- Wall frame assembly


- Fixing elements with corners

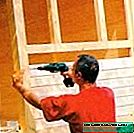
- Wall cladding

- Roof battens


- The board is stacked with a gap of up to 3 mm


- Roofing

Next is the construction of the frame:
- Using thrust bearings, we install piles, the upper part of which plays the role of the supporting struts of the frame.
- We build the lower and upper trim of the house. The binding details are connected to the posts using metal corners.
- We put window and door frames, if they are in the project.
- We mark the middle of the end of the house in order to try on the roof rafters. Strictly vertically nail the rail in this place.
- We apply one board to the left and right side of the end of the conditional roof, mark on them the line of the upper saw cut and the outline of the lower notch used for installation on the strapping.
- According to these patterns, we procure the required number of long and short rafter legs.
- We connect the rafters with a metal plate on the ground and transported upstairs in a finished form. The lower knot in the area of the cutting is reinforced with nails or corners.
Now the finished frame must be sheathed as planned: lay the floor, sheathe the walls, lay the crate and roofing. During sheathing, select holes for the tree trunk where it passes through the floor and roof. We form a hole with a gap around the perimeter of the barrel 7-10 cm for free movement during growth and in case of swaying by a strong wind.

The principle of fencing, window frames and shutters is shown in diagrams with dimensions (+)

A ladder fixed at 4 points for the orphanage is the safest option. However, for a device of this design, pouring concrete supports is necessary to support the lower points (+)
From the bottom around the hole we nail the cuttings of the board to strengthen the floor and prevent tearing of the material. At the end, we install the corresponding canvases in the window and door frame, build and fix the staircase.

Holes are formed in the lower floor of the house and the roof for the tree trunk so that there is a gap between the tree and the structure (+)
Arrangement of the site on the branches
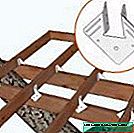
If the trunk has a V-shaped branching, it may well become a supporting base for the lower floor of the house. True, the tree will have to be drilled, which is not too pleasant for him. In addition, the fastening points must be performed so that when the tree is resized and when swaying from the wind, it cannot damage the structure.
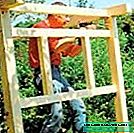
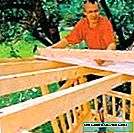
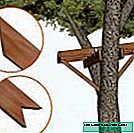
Before you start building such a design of a treehouse, you need to try on. It is needed to select the optimal position of the floor beams. This is best done with a trimmed board, the length of which will be greater than the distance between the branches by about 50 cm. To perform fitting and marking for the described option, you need a reliable ladder and a similar assistant.

- House with branches


- Only powerful trunks fit


- View of the site from below

Having placed the board strictly horizontally, it is necessary to mark the attachment points on the branches and on the board. To find them, one of the branches of the board must be pivotally attached with a nail. Turning the board, slightly shifting its second edge up / down, you should find a horizontal position. Horizontal control should be carried out at a building level, installing it on the edge of the tried on board.
The fitting phase is extremely important because in the future, to correct distortions, it will be necessary to drill a new hole in the wood, which will weaken both the trunk and the attachment point.

As in the previous case, it is necessary to think over safety aspects in advance and choose the optimal type of stairs for movement
Cutting the board will become a template for drawing the distance between the branches on a beam of 100 × 150 mm, which will be attached to the tree. Holes are naturally marked in the center of the workpiece on the wide side. This forms the guide beam of the floor. The distance from the opposite side should be determined by the same method and exactly the same way you will need to make a second beam.
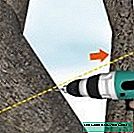
The holes for attaching the beams to the tree should be longitudinal and clearly aligned in the horizon. To do this, from the points marked on the material, lay 5 cm to the right and left sides.Then, with a 12 mm drill, the initial holes are selected at the edges, and the excess between them is removed with a jigsaw. The longitudinal hole will allow the branches to move without destroying the structure installed on them.

The holes for attaching the beams to the trunk should be made in the form of an elongated slot so that when the tree sways from the wind, the tree does not damage the structure
Next, we proceed to the construction of the house according to the following algorithm:
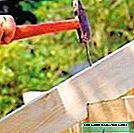
- We fasten the guide beams to the branches through the formed holes, installing approximately 12 mm wood screws in their middle. Fixture length 200 mm. A washer must be installed between the beam and the screw.
- Check the horizontality of the fixed beams.
- We mount on top of them in the transverse direction of the beam of the lower floor of the beam 50 × 100 mm. We install first two extreme, then intermediate. The distance between the intermediate beams should be equal. We fix to the guide screws 80 mm.
- From the end of the installed transverse beams we fasten a beam of the same size.
- Nodal connections are reinforced with metal corners and plates.
- We strengthen the position of the platform with two oblique beams of 50 × 100 mm, the upper edge of which abuts against the formed platform, the lower edge is nailed to the tree. Mounting to the site is carried out with corners, to the tree with 100 mm screws.
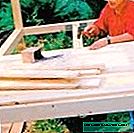
- We lay the floor with a board of 50 × 150 mm. We unite the grooved board and nail it through 4 - 5 pieces to the floor beams. It is permissible to lay the non-grooved board with gaps of 2 - 3 mm, each element needs to be fixed with two screws or nails.
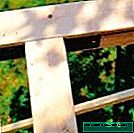
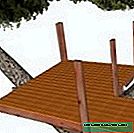
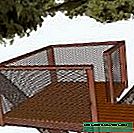
- Along the perimeter of the platform, we construct a fence from a vertically installed board or bar with a distance between the elements of about 10 cm. In the corners of the platform, the bars of adjacent sides are set close to each other. The length of the fencing elements is at least 90 cm so that the full height with the railing comes out about 80 cm
- On top of the fence, lay a bar that will form the railing. The bar is attached with corners to these peculiar balusters.
The site is ready. In order to climb there you will need a ladder, the type of which is selected based on safety considerations. If the host will be the children, it is better to build a durable option on the braid or string with at least one-sided railing. If a ladder is to be used, the bottom of its beam should be pointed and buried in the ground to fix the position.
- Drilling holes for fasteners


- Installation of floor beams


- Installation of beams from the end of the floor

- The principle of connecting elements


- End beam fasteners with corners

- Strengthening the platform with jibs


- Shaping a hole for the barrel


- Fixing floor boards


- Boards for flooring

- Installation of guard racks


- Installation of railings

- Metal mesh mount


- Construction and installation of stairs


- Awning instead of a roof


- The easiest roof option

The design of the top of the site can be varied. Foldable or stationary design in the form of a hut or a gable roof. The construction of the treehouse can be continued by frame technology or place an awning there, stretched over the racks located at the corners.
Video instructions for independent builders
The budget method of building a summer base on a tree:
The experience of American builders in the construction of tree houses:
Our proposed options for building a tree house are most often used by independent masters. With the construction according to the described schemes there will not be the slightest problem. But the result will be appreciated by adult households and the younger generation.