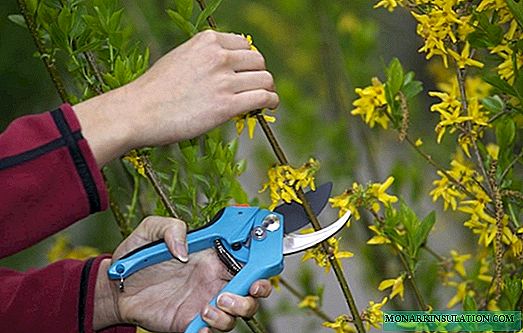
It is easy to understand how to move the violet if you study the relatively simple outline of this procedure. These flowers love a special soil, an accurate watering regime, a special procedure for installing the sprout. In order not to make mistakes, you need to strictly follow the manual.
The main methods of transplanting violets
Before planting violets, it is worth asking how and when it will be necessary to start transplanting the plant. There are 2 main ways. The first involves a complete replacement of the soil, and the second - partial. To determine when and what kind of violet transplant is required, indicators of the state of the soil, the appearance of the flower and its development will help.

Violet planted in a flowerpot
Partial soil replacement
Partial transplantation is necessary if the violet has managed to grow to enormous size - there is not enough space for the root system, it is too early to plant or not.
Procedure Algorithm:
- Remove the seedling from the old container.
- Do not remove the earthen lump from the root system.
- Prepare a new pot with drainage and a layer of new earth at the bottom.
- Set the flower and sprinkle with a substrate on top.
Additional Information! In the process of partial transplantation, you can divide the bush for breeding varieties.

Partial soil replacement
This procedure does not violate the root system, which means that the plant will experience less stress.
Complete soil replacement
Planting a specimen in new soil is simply necessary if the old substrate begins to mold and turn sour. In this case, the leaves will begin to fade and turn yellow in appearance - the plant may die completely.
The procedure is as follows:
- Extract the plant from the substrate.
- Shake off particles of earth and trim the root, removing dry and rotten shoots.
- Break the bottom castings if they are yellow.
- Treat slices with activated carbon powder.
- Put a layer of drainage on the bottom of the pot. Sprinkle it with new soil.
- Install a sprout in the container and add so much soil so that it reaches the level of the lower sheets, partially covers the trunk.
Note! If the root system has become smaller in the process of pruning, the planting capacity must be taken smaller.

Complete soil replacement
After a day, watering is carried out and, if necessary, the substrate is refilled - the violet leg must be closed.
When is it best to transplant indoor violets?
In order for the plant to develop correctly and delight in flowering, you need to choose the right time for transplantation. In this process, it is worth considering several basic factors:
- The procedure can be carried out all year round. The main thing is to organize suitable conditions for growth.
- Spring is considered the best time - the plant goes into the active phase of growth and quickly takes root. The ideal months for the spring season are March.
- You can perform the procedure a little later, but then there will be no flowering. The boundary month is May.
- The flower should not be replanted on the hot days of summer, since there is a huge risk of plant death.
- Winter and autumn are those seasons when the organization of additional lighting is necessary for the normal rooting of a flower.
An experienced florist can choose any time of the year to perform a transplant, as there is basic knowledge of proper and periodic care, the design of suitable conditions and microclimate. It is better for beginners to wait for spring or the first days of autumn.
Pot requirements
Before planting a violet, you must first select the correct capacity. These flowers have a unique root system, which does not grow in depth, but in breadth.

Pot selection
In accordance with this factor, pots for violets are selected. The remaining criteria are not so important, and the design is determined by individual preferences, in accordance with the characteristics of the interior.
Pot capacity
Inexperienced gardeners often make mistakes and plant violet sprouts in huge flowerpots.
Which pot in terms of parameters would be an ideal option for violets:
- A container with a height and diameter of 90 mm is ideal for an adult sprout.
- The size for medium-sized bushes is 7 cm in height and 7 cm in diameter.
- Young seedlings should be placed in special pots for young plants. The depth and diameter parameters are 5 × 5 cm.
Large containers should never be chosen - the plant will die. The pot should contain the root system back to back.
Pot shape
The pot should resemble a deep plate, since the roots are located only on top of the substrate, and the rest of it deteriorates over time.

Violet pot
Therefore, the less land left below the container, the better. A rectangular long or square version of the container may be used. The main thing is that the dimensions of the form are not too large.
Planter selection
A pot for violets can be selected in accordance with the design decisions of the room. It is advisable that the decorative container was suitable in depth and size - the pot should not closely fit into the cache-pot. Material and color are also individual.
In which soil to transplant?
So that the flower does not die after planting, it is worth choosing the right substrate. Additionally, it is worth paying attention to the condition of the soil. Soil for violets should be light, loose, breathable. The soil should consist mainly of light components, trace elements.
Note! You can buy a suitable type of land in any gardening store.
How to prepare the soil for transplanting violets yourself
After determining how to plant the violet correctly, it is worth preparing the substrate. If there is a desire, then you can do it yourself. You only need to know what soil to use.
Fertile soil for violets - do-it-yourself composition:
- turf soil;
- humus from spruce needles and leaves;
- perlite;
- river sand;
- peat.

Soil preparation
To avoid the appearance of insects in a home-made substrate, you need to carefully sift all the components.
Transplant Preparation
When the ground for the violets and the pot are ready, and the plant itself has already been selected, then you can begin preliminary preparation. This process consists of several main stages.
To understand how to transplant a violet at home step by step, you can follow this preparation guide:
- Remove the bush from the old substrate and slightly moisten the earthen lump on the root system.
- The old pot needs to be washed from salts formed as a result of the life of the violet.
- To clear leaves of a plant of dirt and the earth, to dry. Remove the lower leaves if they turn yellow.
- Prepare drainage in the form of expanded clay or special moss. Place drainage and the first layer of earth in the container.
- Set the bush and sprinkle with a substrate. Lightly moisten the soil with a spray gun and cover with a film on top for a day. This will help to form the right moisture.
This process can be completed. Then it remains only to organize the right care.
Transplant Care
If the grower already knows how to transplant violets, then subsequent care is unlikely to be a problem. However, recall the main points:
- Once every six months, superphosphates must be applied as fertilizers.
- In winter, until the end of February, additional lighting is needed. Install a fluorescent lamp at a distance of 20 cm from the bush.
- Monitor the condition of the leaves and the presence of parasites.
Note! The main problem is to establish the correct watering regime.
Manual watering
Watering should be carried out in accordance with such rules:
- Irrigation is done 1 time for 2 weeks.
- Use settled water at room temperature.
- You can’t pour water on the leaves, trunk and flowers.
- You can fill the pan 2/3 with water so as not to fill the aboveground part.

Watering violets
Good watering can be carried out more often if the microclimate of the room requires it.
Devices for maintaining humidity
Frequent watering is contraindicated in violets, but lack of moisture is dangerous. If there is no time to monitor the irrigation regime, you need to come up with a special irrigation system.
For example, organize wick watering, insert a thread into the hole in the bottom, which will go into the pan, and soak in moisture. As a result, water from the pan permeates the “wick”, which feeds the soil in the pot.

Special fixture
You can take a small tube and insert into the ground. Pour in water. Soil will gradually absorb water from the tube, lowering the moisture level in it.
Features of transplantation of young processes
You need to understand exactly how to plant the violet correctly, especially to separate young outlets. The procedure has several features:
- It is impossible to completely remove the earthen lump from the root.
- The shoot is preferably first planted in a pot with a diameter of 3-4 cm.
- The substrate is used the same as for transplanting an adult specimen.
- Children must be covered with a plastic bag after planting.

Transplantation of a young shoot
When the young shoot outgrows with leaves of the edge of the pot, the capacity can be changed to a larger one.
Is it possible to transplant blooming violets: process features
Is it possible to transplant a blooming violet? Such decisive action is required if the flower begins to fade.
Only experienced flower growers know how to transplant a violet at the time of flowering. You definitely need to remove the branches with buds, so the plant will stop flowering at the time of transplant. But the principle of the procedure does not differ from the standard.

Transplanting blooming violets
Indoor flower violet is considered a rather whimsical plant, which requires special attention and care. Difficulties can arise, including in the process of a flower transplant. This procedure is accompanied by a lot of nuances that are important. Transplanting is carried out in several basic stages related to soil preparation, selection of a pot and further care.